How to measure yourself for long riding boots

How to measure yourself for long riding boots
Hello, everyone! Simon here, the ‘Chief Boot Wizard’. Today, we’re going to be talking about measuring yourself for long riding boots and how to do it successfully. This is going to be a real deep dive guide, so feel free to jump to the relevant section for you.
The goal of this article is to help clear up some major questions, worries, and misconceptions that you might have about measuring. Trust me, I’ve heard and seen it all. I’ve measured thousands of people for boots at our shop. On top of that, I’ve been running the technical/fitting side of The Riding Boot Co. for more than 5 years. Let’s just say that’s A LOT of boots over the years!
In this blog I’ll attempt to share every detail that you could need for boot measuring. This will include both bespoke riding boots and off-the-shelf sizes, so stick around if you’d like to learn more on that front.
How do I measure correctly?
Measuring correctly - the big question.
Have you ever read a measurement guide before and taken your measurements (or had them taken by a friend) only to start worrying that you haven’t quite done it right? Well, that’s a story I hear all the time. To help solve this, I shall now explain how to measure correctly as thoroughly as possible – with LOTS of pictures. We’ll be using our current made-to-measure guide (CLICK HERE) as a reference - it's the same thing our customers receive when they place a made-to-measure order.
To start off, let’s keep it simple. Here are some general measurement tips that apply to all the measurements we’re about to explain:
1. Make sure you’re wearing your usual riding clothing.
Don’t be tempted to measure on a bare leg - all you’ll do is potentially have a boot that’s too small for you. Measure over the same breeches & socks that you intend to wear with the boots. It’s amazing what a difference it makes if you do not follow this step. Also, try to make sure there aren’t bits of bunched up fabric under your socks (as much as possible).
2. Keep the tape measure straight, not skewed (example below).
Not following this step is a big cause of wonky measurements (pun intended).
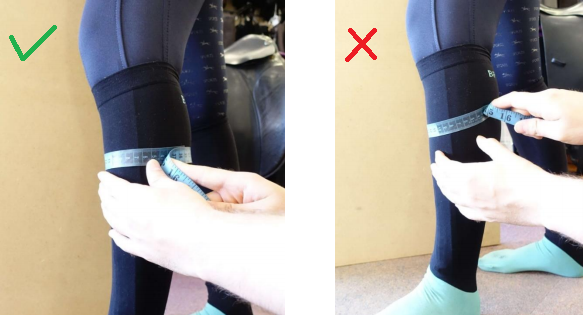
3. Keep some tension on the tape measure but do not over-tighten.
You want enough tension that the tape measure does not slide down the leg but not so much that you can see it squeezing the leg. Here’s a picture example:

As you can see in the ‘correct’ image, the tape measure sits on the leg without leaving a mark/indent and is tight enough so there’s no visible slack.
Don't worry if it takes you 10 minutes to get this bit right, it's worth it.
Okay, now that we have some initial guidelines in place, we’re going to be looking at the required measurements in the following order: A (height), B (under the knee), C (widest point), I (20cm from the floor), D (15cm from the floor) and E (instep).
If you are after a standard size, then you only need to look at the A (height) and C (widest point) sections.
A - Height
The height measurement or A, as we call it. This is the main thing that people get confused or worried about when measuring. As such, we’ll take just a little longer to explain everything before we start measuring.
First surprise and issue, the height measurement may change based upon your riding discipline.
What do I mean by this? Surely, the height measurement is universal. Well, not quite. A dressage rider will want the look of a longer lower leg (they also don’t need to bend their leg as much) compared with a show jumper who needs the flexibility to ride quite short. Essentially, one person could have a pair of boots in a height for jumping and another in a different height for dressage. This isn’t true across the board but it’s definitely something to consider when measuring. I’ll give you the appropriate pointers for your particular discipline when we get to actually taking the measurement.
Next up, dropping. You’ve probably all heard the rule that boots need to be a tad on the long side, to begin with (as they drop with use). There is truth to this and it’s something that we need to account for in our measurements. As a general rule, boots will drop somewhere between 1 and 2cm (depending on style & usage). De Niro gives a guideline of 1.5cm. So when we start, we have to be aware that where we’re measuring from is the tallest the boots will ever be and they will only get shorter with use. Don't let that tempt you to go painfully tall, but keep it in mind.
As a final note before we get started, the height measurement is personal. If you’ve had long boots before, you know whether you like your boots short or tall. At the end of the day, the correct height is the one you’re happy with - so that should be your main goal. If you haven’t had long boots before, then you should simply aim for the ‘true’ measurement using my guidelines below.
Now, let’s get to the fun bit and take some measurements.
To start, you’ll need a slightly bent leg - like this: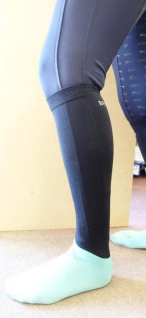
At this point, it helps to have a friend push their finger into the leg roughly where the crease of the knee is (pictured below) - does this feel like a comfortable place for the boots to go up to? Try to imagine the boot going around the top of your leg at this position.
Now, if you’re a dressage rider, you’ll want this point to be as tall as is comfortable (without going over the knee, at all).
As a showjumper, eventer or just a general horse rider, you should instead be aiming for more of a ‘true’ measurement. Use the crease of the knee as a guide (aim at the lower end of the crease) and go up or down depending on your thoughts with the previous technique.
Once you have done all that, you take the measurement like this:
The result is your height measurement. It’s also worth double-checking both legs as there may be a discrepancy if you’ve had a prior injury to that leg.
B - Under the knee
Second measurement: under the knee or B, as we call it. This is essentially measuring for the top of the boot (and how wide it is) - it helps to think what the measurement is for when doing the actual measuring.
This one also needs a lot less explanation, thankfully. The main noteworthy aspect of this measurement is that the tape measure will not be straight.
So, for this measurement, we are going to feel the front of the leg for the bump just below the kneecap (we do not want to measure over the kneecap). Once we have our finger on that point, we are going to measure around the leg at a slight angle, as pictured: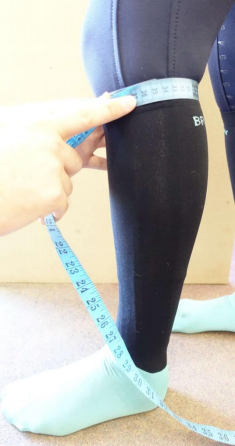
This is your B measurement. As a side note, if you're struggling to find the bump as explained above, aim for a centimeter or so below the kneecap instead. Right, moving on.
C - Widest point
Along with your height (A) measurement, the ‘C’ measurement is the most important. If you’re looking for a standard style or size, you only need these 2 measurements to find out what size you are.
We’re simply going to be measuring the widest point of your calf - here’s a good starting point: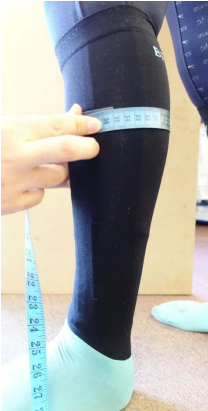
It helps to take multiple measurements at slightly different heights, just to ensure we have found the widest point. Do not take the measurements at an angle; keep the tape measure straight at all times.
Once you’ve taken a few measurements, take the biggest one – that’s your ‘C’ measurement.
D & I - Circumference at 15cm & 20cm from the floor
D and I are the easiest measurements to take. Their purpose is to give you the definition around your lower calf and ankle, so they’re really important.
For both measurements, we start by finding the target height (15cm or 20cm) – I find it’s easier to start with the I measurement (20cm) as we’re working down the leg with our measurement process (feel free to do them in the order that suits you). Here’s a guide: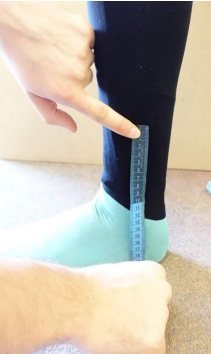
Once we have our target height, we’re going to measure around the leg at this point (again, make sure your tape measure is straight):
That’s all there is to it, just repeat for the other one – now you have your D and I measurements. One last measurement to go.
E - Instep
The purpose of the E measurement is to give you the right amount of clearance around the ankle/instep area.
To start, lift your heel and place the tape measure under it, as pictured:
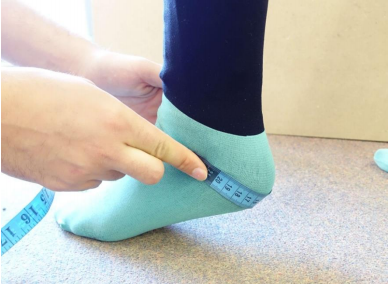
Now place your foot on the floor and bring the tape measure around the front of the ankle as pictured: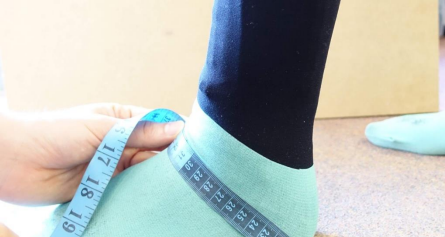
This is your E measurement.
And there we go – you now have all the measurements you need. As a side note, these techniques and guides are the exact same ones that I teach new professional boot fitters. So, as long as you’ve carefully followed the steps above, you can feel safe and confident that your measurements are correct.
Final thoughts
So there we have it. We’ve covered quite a lot today. I hope you have all managed to take something away from this and you can move forward with a pair of boots that you will truly love for years to come. If you need any help on that front, don’t forget to check out our made-to-measure service.
If you’re looking for a great pair of off-the-shelf boots instead, then I would personally suggest you aim at the De Niro stretch panel – just use the A and C measurements.
Lastly, don’t hesitate to leave a comment or get in contact if you want my opinion on anything boot-related. You can contact me directly via email at simon@theridingbootco.co.uk – I’ll try to get back to you as soon as possible.
Simon, Chief Boot Wizard
The Riding Boot Co.
- Simon Bartlett


Comments 0